
Before start my lesson, here is my portfolio, awesome-graphic-portfolio.blogspot.com, I always keeping update my works here.
After I had gotten back from having extra meal of pasta & pizza buffet was just only 11 US$, and finished one of my job which was just sent to my client on 22.00 PM in my time. I have free time now to safe the world again. (This is not about tutorial)
After I had gotten back from having extra meal of pasta & pizza buffet was just only 11 US$, and finished one of my job which was just sent to my client on 22.00 PM in my time. I have free time now to safe the world again. (This is not about tutorial)
I would like to post an interesting tutorial about how to use Pen Tool create realistic object in Illustrator, which now is banana. I suggest one thing when you are creating something in digital painting. You no need to make your work looks 100% the same as real photo. Sometimes creating in your way is better than you take your camera then go out and take a photograph for real photo. Because it's an art that create by your own, it has value.
This time you will see I am not serious how much to make it looks realistic, but I understand its basic about shade and lighting. Finally I will have banana that originally created by my own.
STEP 1
I downloaded this banana from Google and place it on Layer 1 as an original background in Illustrator. I would like to make anything over this layer.

STEP 2
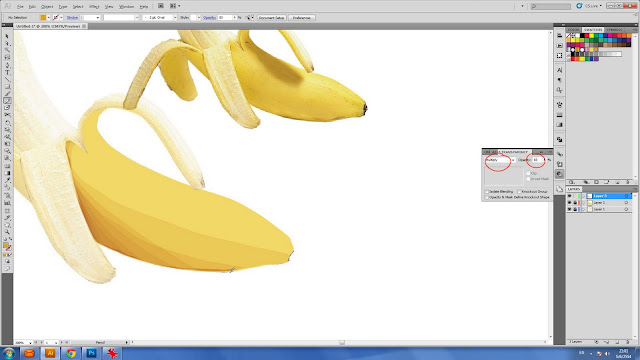
Before you start doing anything, I think it would be accommodate later for you, if you reduce this background banana's opacity to 50%. If you remain it 100% intensity, it will make you confuse when you draw an object over it. After you finish, please lock it, so you won't do anything with this background.

STEP 3
Create Layer 2 (Workshop Layer), you will start to draw something on this layer.

STEP 4
Open your downloaded banana in Photoshop. You need to pick its color to use in Illustrator.
1. Use Eyedropper Tool or press "I". Then left click on the same as my position on banana body to pick color.
2. Go to double click at Foreground color which is the small square at the bottom of your toolbox
3. Copy color color as my example. You need to use this code for color you use in Illustrator.

STEP 5
You have your color code now in memory. Go back to Illustrator
1. Double click fill color box (The same place as in Photoshop's foreground box).
2. Paste your code that you have copied before into the box as marked in picture below. Then press OK.

STEP 6
With the color code you have just pasted. Create new swatch color in Swatch palette. You will not lose this color later.

STEP 7
Use Pen Tool from toolbox then start draw in line with banana shape. I think using Pen Tool in illustrator is easy. Before you start drawing, It will accommodate for you to switch from fill color mode to stoke color, the color box at bottom of toolbox.


STEP 8
Draw the line until it close to beginning.

STEP 9
Back to Photoshop then do the same step as you have done before. Use eyedropper to pick color as my example, copy the code.

STEP 10
Paste color you have copied into Color picker then press OK.

STEP 11
Now we are going to make detail of shade like in original one. Press "N" to activate Pencil Tool or click by yourself from Toolbox. This is my technique about painting in Illustrator, go to set value as mine at Transparency Palette. I set Multiply and reduce opacity.

STEP 13
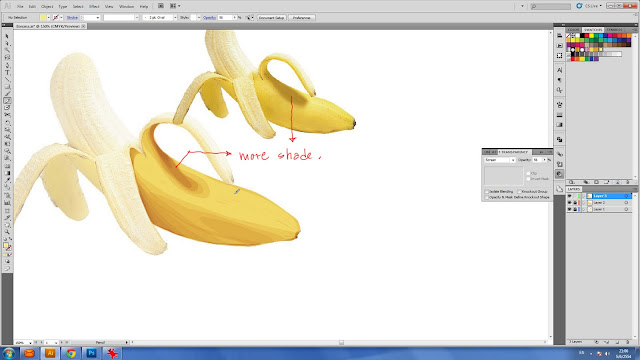
Let's be an artist. Use Pencil Tool draw shade until your banana looks similar to original.

STEP 14
You see that? Just making shade over and over on the same area until banana looks dimensionally. It becomes like this because the effect "Multiply". It will make anything looks darker and darker if you draw again and again over on the same location. This effect can work well for making shade and shadow.

STEP 15
Sometimes you need to adjust different value for opacity at Transparency palette, to make different mood of shade.
STEP 16


Related Links


STEP 16
Do like same thing before. Now I want to make light shade. I need to get back to Photoshop to pick this color.

STEP 17


STEP 20
Make you finished artwork looks interesting by placing earth tone of background behind.

STEP 21
To make it looks complete, you need to put blur shadow. Use Ellipse Tool from Toolbox then draw a circle. At Gradient palette, set color as mine. You will have gradient circle like in the picture.

STEP 22
Use Multiply at Transparency palette, reduce its opacity

STEP 23
Distort the gradient's shape and position it under the banana.

END
Put some text to make it looks interesting. Congratulation!! you have banana created by your own

If you want to see my artwork for banana. You can click HERE to download.
I also have another fruits in vector art used my technique as below
If you happy to use my vector art of banana, you can download from HERE.
Related Links
LOGO Design : Thai Literature in Vector Art Updated on May 28
Now is my 2nd alternative for client.....
APHRODITE : The Biggest Cabaret Show in PHUKET Updated on June 01
Today, It's not so much work to do except designing...
Juice Cup in Vector Art Updated on May 18
Last year, it was interesting for me has a chance to design ...
Juice Cup in Vector Art Updated on May 18
Last year, it was interesting for me has a chance to design....
